Set up for Halloween 2011 started in late September this year. It always begins by constructing the attic scene, as it is the most detail oriented out of the two (attic & cemetery). In addition, it can withstand any harsh Wisconsin weather that may come our way, as it is essentially located inside.
The first thing we always do is install the large black canvas that becomes the backdrop of the scene. This also doubles as a divider to create the "backstage" area. It is where I keep all the boxes of decorations that are brought up from storage in the basement, as well as house the mechanics of some of our animated props.
The second prop we wanted to get up right away was the Christmas tree, as this was new for this year. Once we got that up and figured out where exactly we wanted it put in the scene, we lit it with a blue spotlight, and went crazy from there. All the other props were placed in relation to the tree, as to make the scene look fully fleshed-out. The attic houses a lot of detail, especially in its massive number of props, so it is important to get the basic layout of the scene set before we add all the small details.
About a month before Halloween, the cemetery fence gets put up in the front yard. I try to build my props to be very sturdy so they can withstand the wear and tear that occurs by being installed and torn down year after year. I'm pretty sure this thing could withstand 100 mph winds, so I never worry about putting this out early. The same goes for the Greywood Estate wooden sign. Anyways, we grow out the grass in the cemetery for about a month to give it a more natural, organic feel. It's those little details that really set this haunt apart from others out there, and make it "feel" right.
As the weeks passed, the graveyard slowly started getting its tombstones installed. These are one of the hardest props to maintain, as the wind can easily get to these. And man, the weather was not good to us this year! The neighbors' various haunts suffered some damage as storms blew past throughout the month.
About a week out from Halloween, the decayed garland and wreaths went up to frame the attic scene on the garage. Final flood lighting also went into the graveyard. Lighting is something I've never been too concerned about, as trick-or-treating occurs mostly during the daylight hours, but I am slowly building up a collection of lights. The graveyard boasted three flood lights this year. In addition to the red (to light the pop up ghost) and the blue (to light the tombstones), I added a green (to again, light more tombstones). This year we had more gravestones in the cemetery than ever before, and it was looking way too dull at night without that second spotlight focused on them. The blue and green created an eerie wash of color to the entire area that looked very nice.
The week of Halloween itself was very crazy personally for me - but in a good way! With projects being due for school, trips with friends to other haunted attractions (for both entertainment and research), and other various events to attend, it can get very hectic. It is my absolute favorite time of year, however, and in all - I think it was a very good time!
And then it's Halloween night - or the last Sunday in October, in my case, as that's when our town holds its trick-or-treating hours. The hours, like usual, were from 4-7pm. Usually, the greatest number of trick-or-treaters visit during the first two hours. And then the last hour (from 6 to 7) is when it gets dark out. Unfortunately, like I stated before, the weather was very bad. There was a slight breeze, but the main complaint comes from the cold rain that visited as well. It was never a downpour, but a light to steady shower that lingered for the entire day. This made it very cold, prevented us from putting our bio-snow in the cemetery, as well as running the fog chiller.
The weather also caused our trick-or-treater count to be down this year. In the past, the number has danced around 250. This year, we only got about 170 or so. To be safe, I had bought enough candy canes for 500 guests. We still have some left...
That being the case, I still had an amazing time that day. I got numerous compliments - even a guest that I did not know saying that I would make a good Imagineer! It is this fuel that keeps me going year after year. In the end, it really does come down to being able to provide a unique, entertaining experience for your guests, both young and old alike.
If you have any comments or questions - or if you ended up seeing my haunt in person this year, feel free to comment respond with your thoughts below. I'd love to hear what you all think!
12/08/2011


12/07/2011


10/31/2011
Happy All Hallows Eve!!
Today is October 31st - marking the true day of Halloween for the 2011 year.
To celebrate, I'm posting two videos of some Disney related Halloween things.
First off is a very impressive Haunted Mansion model a different person produced in Google SketchUp (the program I've used to model a few things).
And finally, a video of HalloWishes - The Magic Kingdom's Halloween Fireworks show.
We'll go out with a bang this year.
http://www.martinsvids.net/?p=701
Have an incredible Halloween everyone!!
10/30/2011
10/24/2011
The Stage is Set
Less than one week until Halloween 2011!
Here's a few final pictures on the status of the haunt before it opens to the public.
In the coming weeks, I'll be writing much more in-depth posts on how everything went, and what I would and wouldn't change for next time.


Here's a few final pictures on the status of the haunt before it opens to the public.
In the coming weeks, I'll be writing much more in-depth posts on how everything went, and what I would and wouldn't change for next time.


10/17/2011
The Entrance to the Estate
A few more pictures on the status of the haunt...
This weekend, I got the estate sign up. The wind was causing some issues with the hanging portion of the sign yesterday, but we fixed the problem by tightening the metal hooks it hangs on.


This weekend, I got the estate sign up. The wind was causing some issues with the hanging portion of the sign yesterday, but we fixed the problem by tightening the metal hooks it hangs on.


10/10/2011

10/03/2011
Where the Tombstones Quake
This week's sneak peak is of the cemetery out front. It's not much yet, but the infrastructure has been laid, and work should now be able to progress fairly quickly.

10/01/2011
40 Years of Magic
40 years ago today, the Haunted Mansion debuted as an opening day attraction in the Magic Kingdom at Walt Disney World in Orlando, Florida. As the main inspiration for Greywood Manor and my overall love of Halloween, today we celebrate this special anniversary of my favorite attraction, and my favorite place in all the world.
So Happy Anniversary! I was not able to make it to your 40th, but I'll surely be there for your 50th!
So Happy Anniversary! I was not able to make it to your 40th, but I'll surely be there for your 50th!
9/25/2011
First Look INSIDE The Attic of 2011
I'm excited to share the first picture of Halloween 2011 - Inside the Attic.
Work is progressing on cluttering up the attic...

9/20/2011
999 Happy Haunts
Thanks everyone for your continued interests in my Halloween Haunt endeavor. With your help, we've reached 999 visitations to this site (not counting my own)!
But there's room for a thousand... Any volunteers???
9/19/2011
Ouija Board Crate
First off, my apologies for getting this post out late. It's just been very crazy with the start of the school year again. So much to do!
This week, work completed on the Ouija Board Crate. This crate will now serve as a permanent home for the Ouija Board - the centerpiece effect of the attic scene. Note that before we'd just use a cardboard box - and get a new one year after year. Now, we have something that is themed a bit better - a "plussing" of a prop, to throw around an Imagineering term.
For a formal definition, we can turn to the Liar's Guide to Disneyland...
"Plussing" something means making it a little bit better. For example, a Mickey Mouse hat plusses a guest's head (24).
With that term defined, let's move onto the construction process of this original prop.
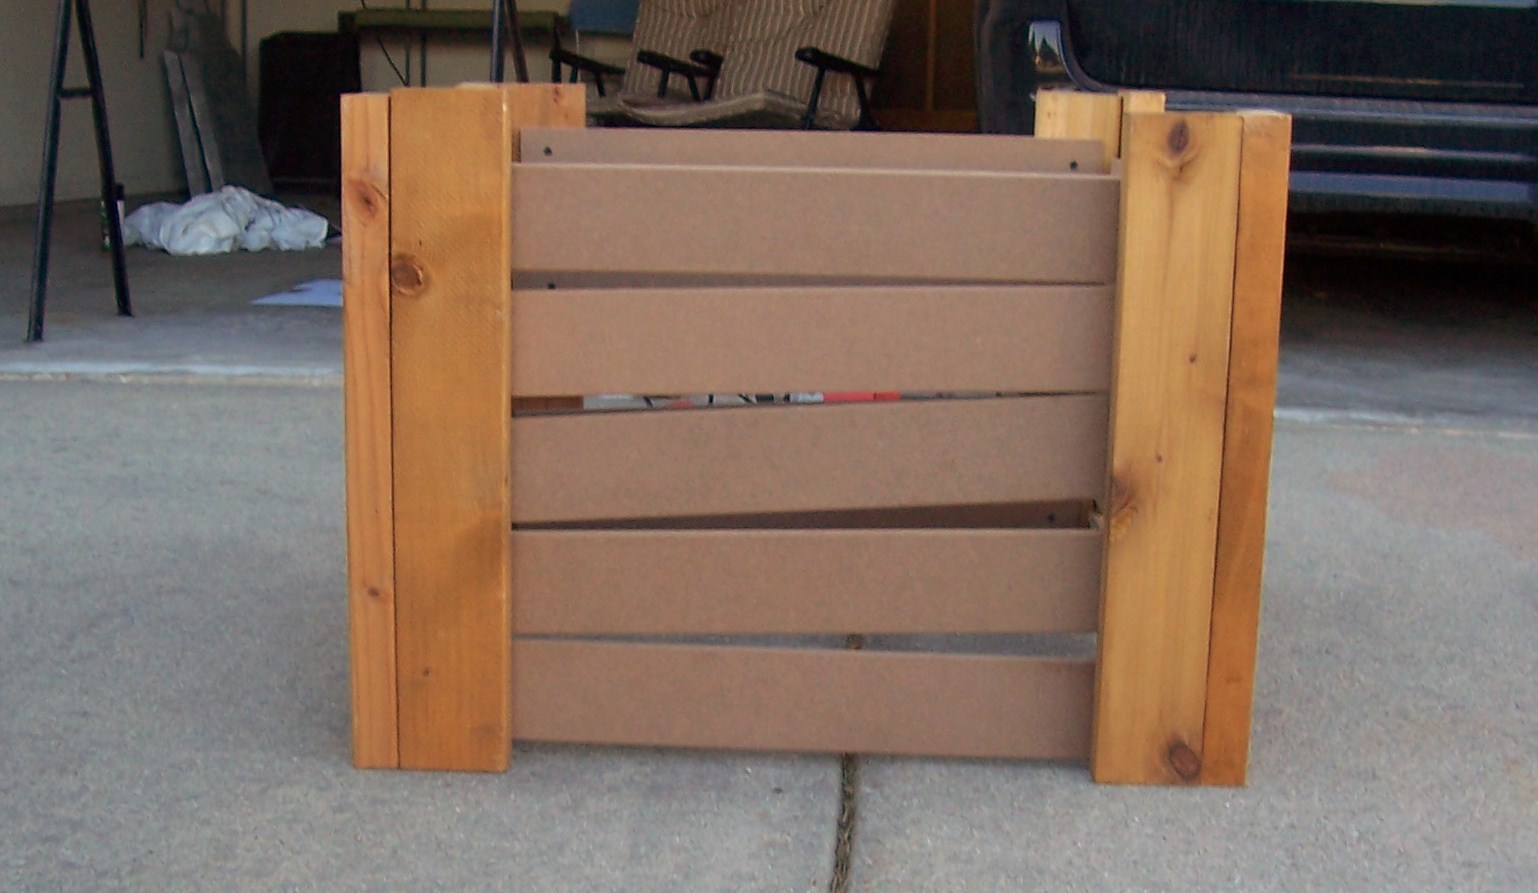
We started by staining the four posts of the box, which are constructed of two pieces of wood nailed together to form an "L" shape.


We then created a stencil out of computer paper for the word "attic" - so the audience knows they're looking into an attic scene (Note: only one other box in the attic scene has the word "attic" spray painted onto it that is still around. When the attic scene first debuted in 2007, the original Ouija Board cardboard box had "attic" spray painted on as well, but in 2008 and 2010, we never got around to adding it again).

While my friend Sam was working on the stencil, I started screwing in the boards to the posts. Observe that I purposely made them crooked.

Then the box started coming together. The boards themselves are two feet in length. I bought that compressed wood at Menards for only $1.97 per 8 foot board. Very reasonable!

Eighty screws later, and it's almost complete.


We then used the stencil and some black spray paint to transfer the letters onto the front of the box.


Subscribe to:
Posts (Atom)